The space. well framed.
How a room is perceived in 360°film is largely determined by the representation of spatial depth and lighting.
The Depth of Space - MONOSCOPIC VERSUS STEREOSCOPIC RECORDING
Stereoscopic shots create additional spatial depth, which can intensify the spatial experience in 360° film.
For monoscopic 360° recordings, we recommend to place the prioritised action in front of one of the camera lenses. For stereoscopic shots, it is important to place the 360° camera so that the key activities are performed between two lenses. After both camera sensors record the action, a good stereoscopic image can be created from this. Another important influence of the stereoscopic image quality is the distance from the filmed object or action and the camera. Camera manufacturers give different information on the ideal distances to create an optimal 3D effect.
Based on the findings from the research project, we recommend a minimum distance of 0.5 m. We advise you to do tests to get as close as possible to the desired effect of depth perception.
It is also important to stabilise the camera. Otherwise, unwanted side effects such as "motion sickness" cannot be ruled out. This is especially important for stereoscopic 360° films because the 3D technology intensifies the motion effects. If a shot with a moving camera is planned, the movement should only take place on one axis at a time (X, Y or Z). Newer 360° cameras have better stabilisation functions. Even with this support system, we still recommend that you mechanically stabilise the camera. For optimal stitching results, the camera should be placed horizontally level. A good tripod with a spirit level offers advantages here.
LOW LIGHT - SHOOTING UNDER VARIABLE LIGHTING CONDITIONS
360° film cameras do not usually have large image sensors. For this reason, they need a lot of light to produce well exposed images with a high level of detail. This is needed to stitch the footage together in post-production. In order to get the best possible footage when shooting in a low-light location (e.g. a night shot), there are different approaches. Do you want to make the room visible in the dark or just capture individual light sources in black? In the first variant, we change the camera settings via the integrated histogram function based on the darkest point in the room (exposed to the left) and in the second we adjust them to the light sources (exposed to the right).
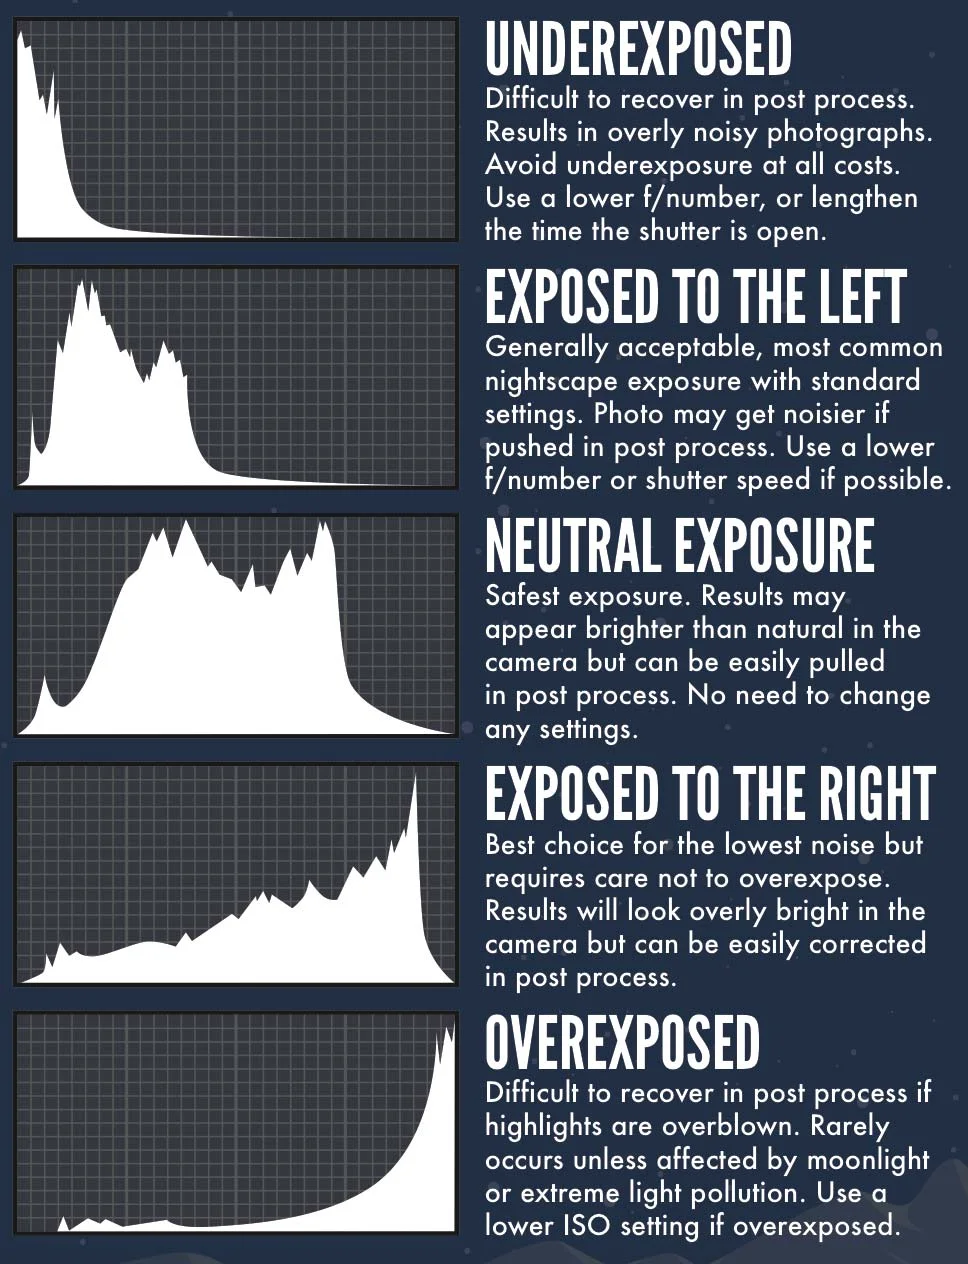
Example of a histogram display as available with camera settings of newer models.
With smaller 360° cameras such as the GoPro Fusion, Insta 360 or Rico Teta, the sensitivity can be increased by raising the ISO number. However, caution is advised. The image sensors produce a lot of image noise from ISO 400-800+. Some of this noise can be reduced in post-production with plugins such as NeatVideos Denoiser or other denoising plugins. However, it is highly advisable not to rely on these software-supported options alone, but to strive for a base material that is optimally exposed. Often, undesirable side effects such as colour changes or loss of detail occurs with subsequent corrections.
A second option is to increase the shutter speed. This cannot be adjusted directly on the GoPro Fusion, but only via the frame rate. The less light that reaches the sensors, the longer the shutter speed is set by the GoPro. This is particularly problematic when the filmed object is moving. For this reason, it is advisable to fix the camera either on a tripod or on an object when shooting low-light footage. This way there is less motion blur.
From the field: For the research project, two 360° films were shot in low-light environments. One was CAVES by Carlos Isabel Garcia and the other was NACHTSPIEL by Robert Müller and Christophe Merkle. The insights gained from these films form the basis for the following explanations.

360°film Still from CAVES (2021) by Carlos Isabel Garcia.
For CAVES, an attempt was made to show the cave and the activities of the cavers with the help of artificial light. The GoPro Fusion and Scurion Led lights were used for the filming. The speleologists climbed through the caves for around 6-10 hours. Therefore, it was important to have enough batteries for the lights and camera. Additionally, the frame rate was reduced to 25 fps (frames per second) so that the GoPro Fusion could use longer shutter speeds and thus produce brighter images. In post-production, colour correction tools were used to lift the shadows and reduce highlights. In the approach, options were chosen to make the environment appear as bright as possible with the risk of overexposing and burning out the light sources. This is the Exposure to the Right philosophy.

Still from NACHTSPIEL (SRF, 2019) by Robert Müller and Christophe Merkle.
For NACHTSPIEL, the focus was on the fireworks and the surroundings were left in the dark. The challenge was to capture the fireworks with as little loss of colour information as possible despite overexposure. The intention was to show the firework fast movements as smoothly as possible. For this reason, we shot with the Insta360 Pro and at 60 FPS. In order to keep the motion blur as low as possible, the shutter speed was set to twice the number of frames per second. We advise to experiment with this ratio in advance and to search for the optimal setting within test series, as only small corrections are possible in post-production.
To simplify the image stitching, the surroundings were illuminated by artificial light and recorded before the fireworks were set off. With this reference shot, it was possible to create a stitching template in the program during post-production and adjust the horizon and background. This was especially important because NACHTSPIEL was shot in stereoscopic 360°.
When shooting at night in low light, the challenge is to find the perfect balance between ISO and shutter speed. Here, it is advisable to check the parameters and take various test shots and check them in the VR headset. For Nachtspiel, the settings were decided only after the third test. Shooting was done with 60FPS and 1/120 shutter speed as well as 400 ISO in flat colour mode. With 60FPS, the movements of the fireworks appear much smoother, especially when viewed with a head-mounted display.
We recommend setting the ISO number to be no higher than 400, except in case of an emergency and the shutter speed to be no lower than twice the frame rate. To get more options in colour correction, we recommend activating the ProTune mode with the GoPro Fusion and the Flat Colour Mode with other cameras. If the 360° film is only viewed on YouTube or Facebook, the FPS can be left at 24. If it is to be viewed on an HMD, we recommend setting the FPS to be as high as possible.
Further link on this topic
http://360rumors.com/2018/03/exposure-360-cameras-low-light.html
https://www.youtube.com/watch?v=z578Ex50CBY